Lego Telepresence bot: how not to try and build one
26 Jun 2019
Originally posted at https://tech.labs.oliverwyman.com/blog/2019/06/26/telepresence-lego/
Four years ago, I built a Dalek-based telepresence bot (part 1, part 2), and I’d been idly thinking for some time that what I really needed to do was make a better follow-up, as a much better one could probably be done with Lego Mindstorms especially given the existence of the BrickPi board for interfacing that with a Raspberry Pi. My major reason for picking Lego is that my hardware skills are pretty ropey and so Lego seemed like a good way to get flexibility while needing a minimum of skill in that area.
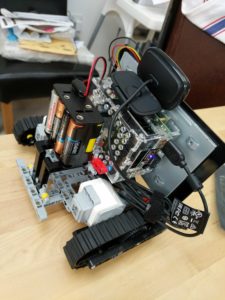
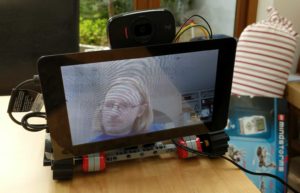
Recently we ran a hackathon at work, and this seemed like an ideal time to work on this project. All the parts were ordered, and I had 48 hours to get this working. Plenty, right? Well, everything went well to begin with. I worked out how to get the BrickPi, touch screen and Pi connected, and my predicted issues with GPIO clashes didn’t materialize. I tested a Lego sensor with the BrickPi test apps and all appeared well. Next I needed to wipe the Linux image and install one of the Android images I’d found for the Pi so I could boot Zoom (our preferred video conferencing app, which only has an x86 Linux version, but works under Android for ARM devices).
I’d looked up the existence of Android images for a Pi beforehand and assumed that given there are several out there that they should install easily. Some didn’t boot because of issues with the Pi 3B+ board I was using (it needs a 4.18+ kernel, but it exhibits with a red flashing light which made me think it was a power issue), others booted but didn’t support the video display or the webcam, etc, etc. All in all this ate a day of the hackathon time because I was continuously in a state of making ‘just one last attempt’, and each try cost a lot of turnaround time writing new images to SD cards and booting new systems. In theory, I could make my own image, but this felt like a deep rabbit hole that I didn’t have time to work with at that point.
At about midday of day two, I decided to instead just boot a standard Raspbian image and make that do some other video conferencing application (I ended up using the https://appr.tc/ WebRTC demo app, but would have put together my own if I’d had more time). I hadn’t even started the assembly of the Lego at this point, and in the end I only had time to build a basic chassis that’s front-heavy and unstable.
I was then about to make the motors do things and it turns out there were power issues—I only had one set of the 8 AA batteries it needed around, and it turns out they were low powered. Instead of getting the ~12V that would make it happy, it was seeing ~5.5V, and that’s below the 6.8V threshold where it’s willing to work at all. I could probably have fixed this by just buying more batteries, but other faults in the setup meant I judged it wasn’t worth it at that point.
Lessons learned:
- Don’t try and do complicated hardware projects in a 48 hour project (I have done a hardware hackathon successfully before, but that was a pre-built target—a couple of Phillips Hue lights)
- Even if you’re pretty sure there’s only one person’s worth of stuff to do on a project, get someone else to help out, if only to keep you from going off piste!
I have however since acquired some additional batteries, so here’s a quick demo of the robot going a bit off piste itself.