Telepresence Dalek: Part 1 – Remote control
18 Apr 2015
Convention Hardware Howto Javascript PythonOriginally posted at https://tech.labs.oliverwyman.com/blog/2015/04/18/telepresence-dalek-part-1-remote-control/
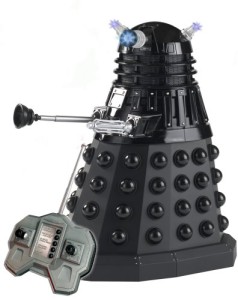 Earlier this month, I went to a science-fiction convention by the name of Dysprosium. At said convention was a competition called “Dalekdrome”, with the idea of taking remote controlled Daleks and then customising them. When I was first told about this, I was at another convention where someone was attending via a telepresence robot, and so the slightly wacky idea of the Telepresence Dalek was born...
Part 1 (this post) is about the remote control mechanism, and part 2 (later on) will be on the video bits. Photos here are a mix of stock photography and my own photos taken afterwards as I forgot to take ones while making it…
 So, you’ve got your Dalek. There are two main options you can go for for remote control – either a) wire something into the Dalek’s internals or b) wire something into the remote control. I
 went with option B, because the soldering work looked a lot simpler (and I had a guide to something similar to work from).
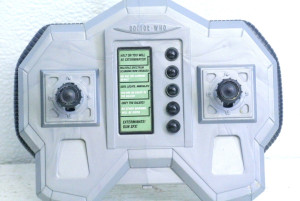
The remote control is still a bit of a pain to get into, as even once you’ve removed all the screws in the back and unscrewed the aerial from the top, it won’t come loose. I ended up snapping off the two tops of the control sticks, as I figured I wasn’t going to be needing them fairly soon.
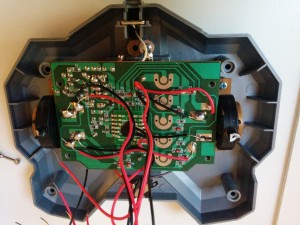
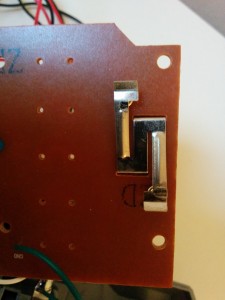 Once you’ve opened it up (which won’t have the red/black wires shown here, as this is after I’d done the soldering) it turns out that the two movement switches (far left) don’t have any sort of response to how much you push them, but are just simple off/on “complete a circuit by touching two bits of metal together” deals (near left, underside of circuit)
Those bits of metal have a pair of nice big pads sitting on the top side of the circuit, so even with my rather dodgy soldering you can still attach some wires to them. You’ll end with 4 pairs of wires altogether, for up/down for each of the two thumbsticks.

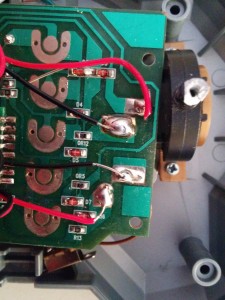
I’d advise having some sort of sensible colour scheme – I went with red/black pairs. At this point, you should be able to power up the remote and Dalek, touch a pair of wires together and make the Dalek move, confirming that it’s just a matter of closing the circuit. Once you’ve done all of that, close up the controller case, passing pairs of wires through the sound effect button holes.
For those of you paying attention to the controller, you’ll see the 5 pads next to my soldered wires for the 5 sound buttons. Wires can also be added to those, but I only had 4 control channels to work with so I skipped those ones.
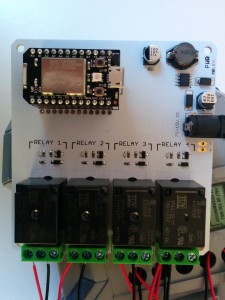 You’ll now need a Spark Core and the Relay shield. Go through the getting started guide for the Spark and make sure you’re able to run the Tinker app. Setting any of D0-D3 to HIGH with the digital write operation should get you a nice “thunk” sound and the relevant relay led lighting up on the Relay shield.
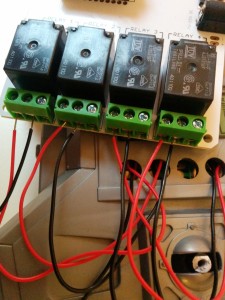
Power everything down, and wire up each of the pairs of wires to the NO (Normally Open) and COMMON terminals of the relays (doesn’t matter which way around). Power everything back up again, and those D0-D3 operations should now result in the Dalek turning. They should correspond to (in some order) left/right turn forwards/backwards. Note that there’s no simple “forwards” because the Dalek uses a tank track style mechanism and we’re going to have to do two signals to do that, but we’ll fix that in a moment.
Download the files from https://gist.github.com/palfrey/0ecd5be283c19c30b19d. Edit tokens.py replacing YOUR_USERNAME and YOUR_PASSWORD with your Spark.io login, run it and replace SPARK_TOKEN_FROM_TOKENS_PY in controls.js with the token it gives you. Also replace the SPARK_CORE_ID in controls.js with your Core id (“spark list” should be able to get you this).
Now, if you’re lucky and you’ve rigged things together in the same way as I did, opening controls.html should give you a bunch of buttons that’ll make the Dalek move in various ways when you hold down on the buttons, using the magic of the Spark’s built-in app and a bunch of POST requests. If however you’re connected it up differently, I advise playing around with the various mousedown() handlers in controls.js. “All Stop” is partially there because sometimes the Spark Core seems to go a bit nuts, and this just switches off all the relays.
So, you’ve now got a Dalek you can control over the internet, but no video. In part 2, I’ll show how I eventually got functioning video…